Intro
I am a big fan of "natural-like digital drawing" idea when we are trying to emulate real drawing media workflow with digital tools instead of just do imitate this drawing media look with assortment of brush shapes. It looks like "Apple Pencil" technology engineers sharing the same passion and trying to reduce the gap between natural and digital drawing processes as much as possible. The principle of operation and even the shape of the "Apple Pencil" as close to the real pencil as it is possible.
Now look at how this artist holding his pencil and the shape this pencil has. It is called overhand grip. Switching between overhand and traditional drawing ways in combination with such shape gives the artist ultimate control over stroke size, opacity, and flow. In an app called "Infinite Painter" you can find a default brush called "Proko Pencil". This brush allows almost perfectly emulate this charcoal pencil workflow. I can clearly say that this is the best example of synergy between hardware and software parts to achieve true natural-like drawing feel in digital drawing.
Stay with me. I am close to the point of this article. I want to do the same but in the desktop environment with usage of my favorite drawing software called "Krita" and the last iteration of "EMR" driven hardware called "Wacom Movink 13". In other words, we are going to do some advanced brush creation. Let's get started.
I am not going to explain each step in small details, just because I will update this brush occasionally, and you can download the result and try it yourself anyway.
Please note that firstly, you need to adjust your tablet curves to the consistent and comfortable for yourself state. Brush curves settings are only to emulate some natural processes, not to calibrate the tablet. You can find a guide to achieve comfortable and consistent pressure level transition in my
"Wacom Intuos Pro L" guide.
Brush creation process
Brush tip shape creation
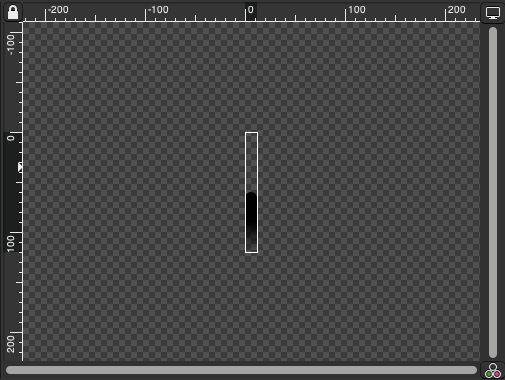
Firstly, we are creating a brush tip mask. At first, I thought about some specific shape that would resemble the tip of a charcoal pencil. But then I realized that not a shape of the pencil tip need to be imitated, but the shape of the area of the pencil tip that touches the paper. And this is a simple form - just a line with a b&w gradient 0%(100%) > 50%(100%) > 100%(0%).
The maximum length of the brush tip shape will be 60 pixels. One of the problems of "Krita" that the brush tip mask represented there as a certain square area where the point of contact of the stylus always at the center of this area. Therefore, the brush tip mask should be made in the way when brush tip shape starts from the center and until the bottom border of the brush tip mask. So the total length of the mask will be twice as large - 120 pixels.
The width of the brush tip mask will be in a ratio of 1 to 5 from the length of the brush tip shape - 12 pixels.
If you want to create precise SVG shapes, I have a
guide about how to make it with usage of CAD constraints.
Brush engine
So it is time to create new brush in "Krita".
Most users using "Pixel" engine for simple sketching brushes, but charcoal media has tendency to smudge, so "Color Smudge" engine suits much better in our case.
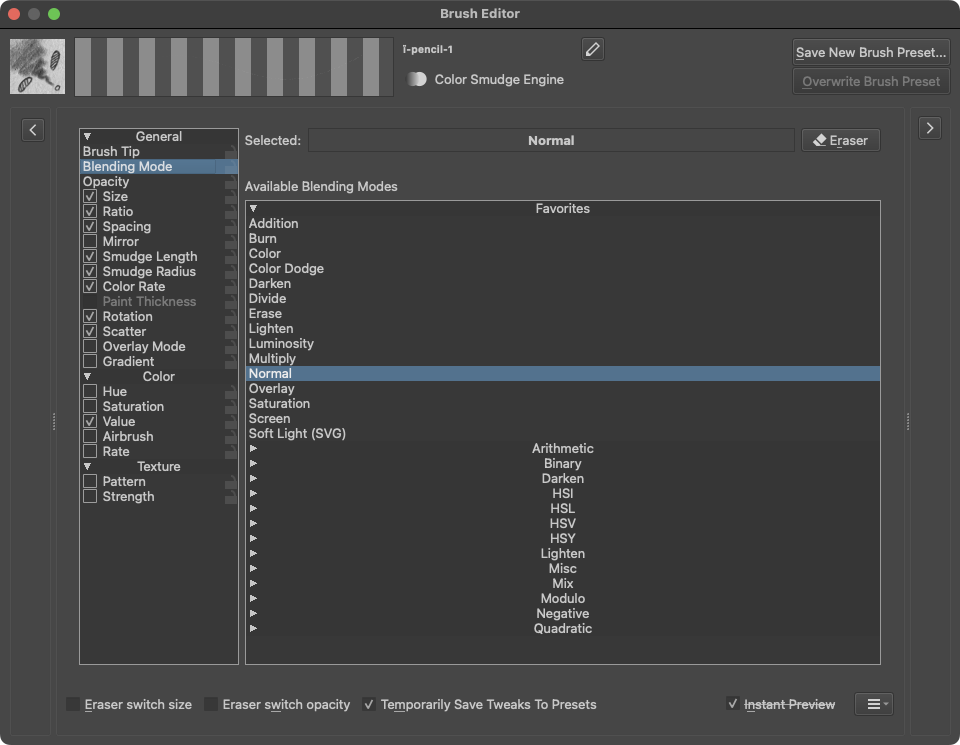
General > Blending Mode
We are going to use "Normal" blending mode instead of "Darken" like other people usually do to have possibility to use white color in some cases.
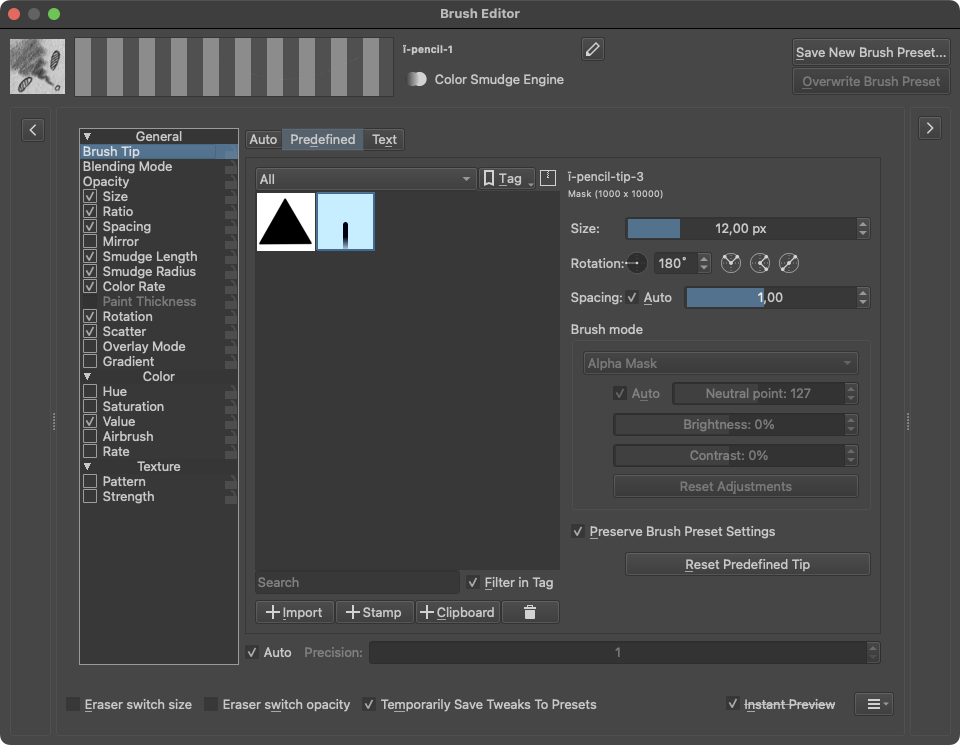
General > Brush Tip
Select "Predefined" tab. Import prepared brush tip ".svg" file. Select it as a brush tip. Because it is a vector shape, Krita automatically set size equal to 1000, so in case of 12 x 120 it will be 1000 x 10000.
Set "Size" of the mask to 6px, and you will see that the brush size will also be changed to 120px regarding the dimensions of the imported ".svg" mask.
Set the default angle of the tip to 180° because it is important for proper angle data output in the next section.
"Spacing" settings can be set to "Auto" with coefficient of 1.
"Precision" can be set to "Auto". No need to waste computing resources on extra precision because the brush operates with big shapes, and we are going to apply different randomization in other settings.
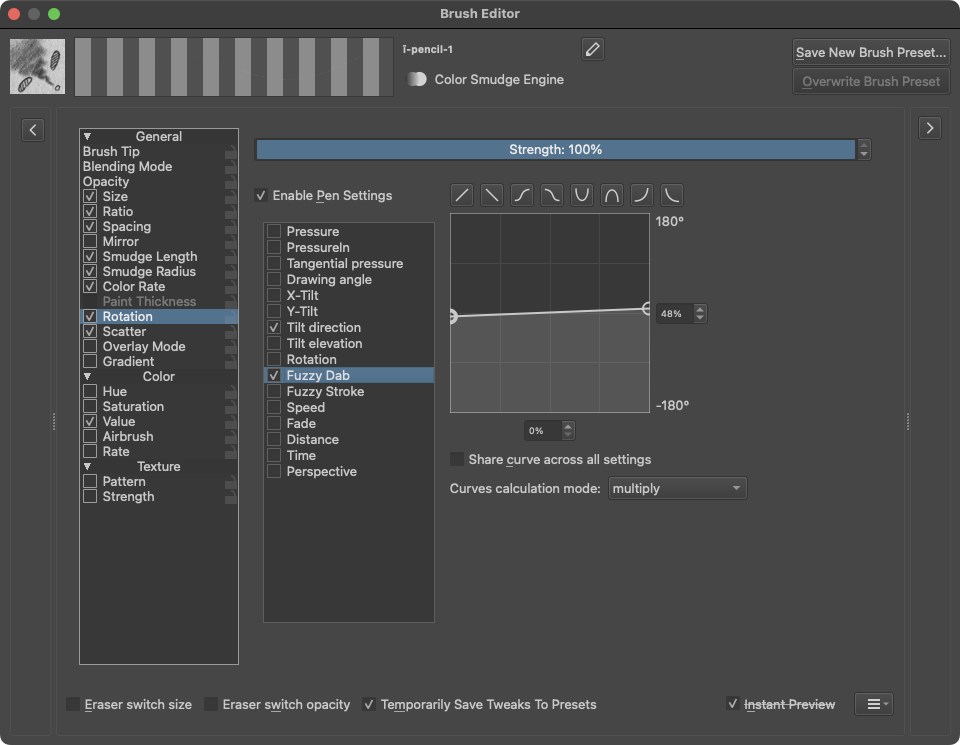
General > Rotation
As we are trying to do as realistic charcoal pencil as possible, it is essential to control brush direction. For this purpose "Tilt direction" sensor is used.
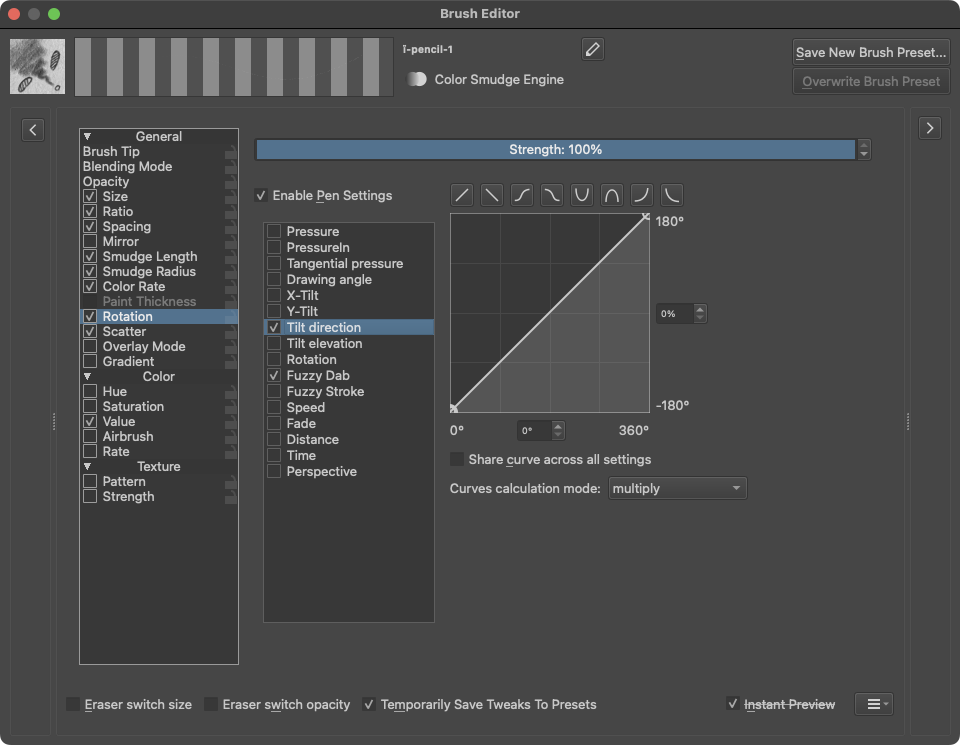
Now we are going to use "Fuzzy Dab" sensor with a pretty specific linear curve from 48% to 52% so nesting of the pen tip shape will form a triangle with an acute 360°/100%*4% = 14.4° angle. This is the first randomness.
General > Ratio
The brush tip shape already represents a long line of contact between the charcoal pencil tip and paper at the maximum angle of inclination. "Size" option controls the scale of the brush tip shape. "Ratio" affects only the length of the brush tip shape, and this is exactly what we need in this case.
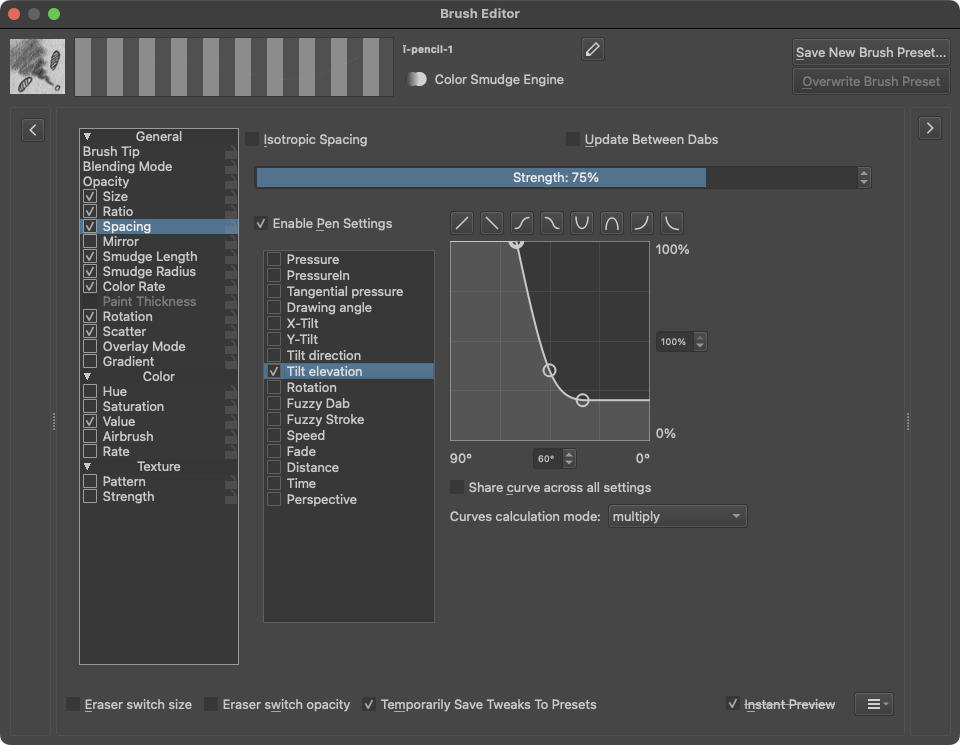
So let's tweak the length of this brush tip shape, depending on how the user holds the stylus and angle of inclination to the drawing surface. For this, we are using "Tilt elevation" sensor.
When stylus at an angle of 90° to the drawing surface, it means that charcoal pencil has 0° angle of inclination and touching paper with its pointy tip only. At this angle, the brush tip shape is supposed to look like a dot instead of a line, so we need to set the ratio to make width (12 pixels) and length equal. So curve start will be from 12px/(60px/100%) = 20%.
From 0° to 30° angle of inclination user holds the stylus in the classic way and the charcoal pencil keeps touching paper only with its tip, so brush tip shape ratio is supposed to stay at 20%.
Then we have a small exponential transition to linear dependency.
And finally, linear dependency to the maximum angle of inclination when brush tip shape supposes to reach 100% ratio. But with both real pencil and digital stylus we have limitation in maximum angle of inclination and in this case, it will be 60°.
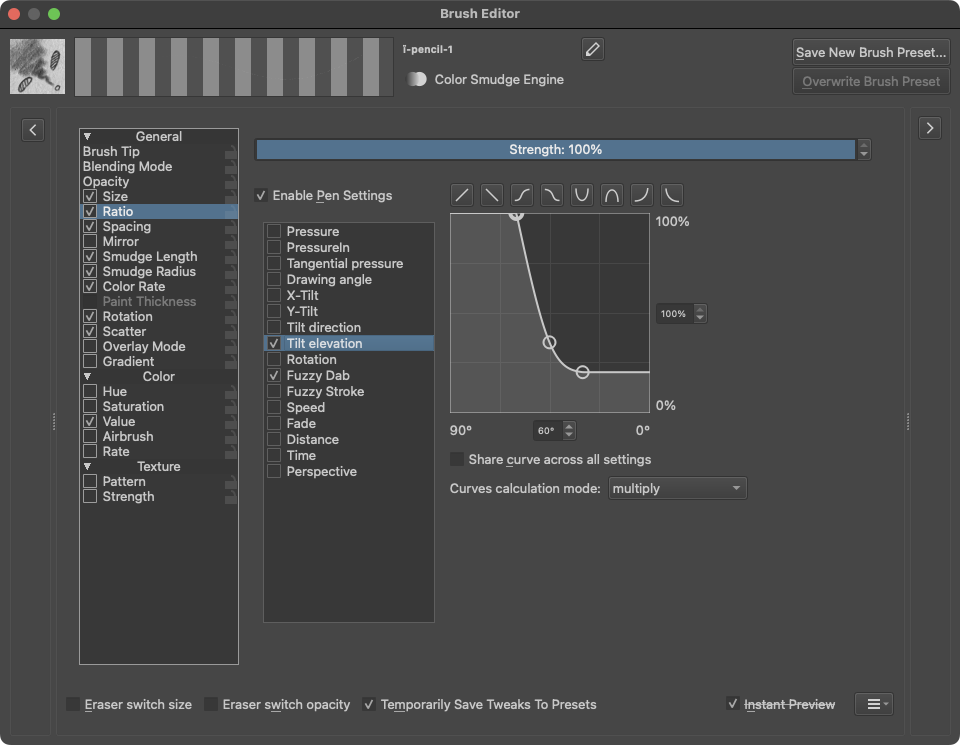
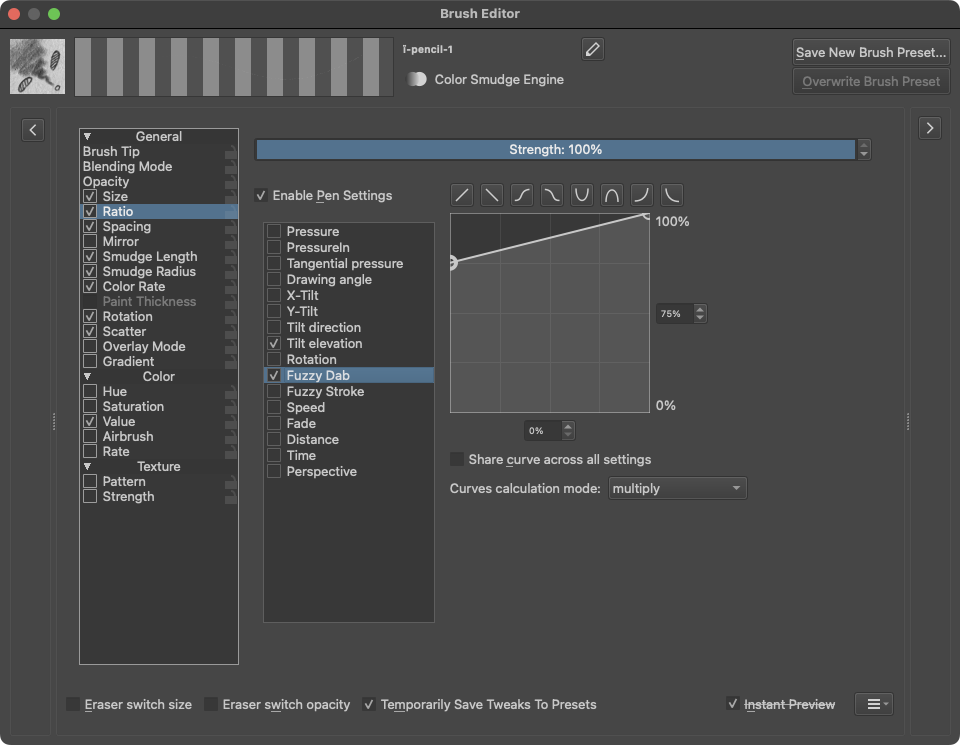
Also adding "Fuzzy Dab" sensor to add randomness from 75% to 100% of the ratio. This is the second randomness.
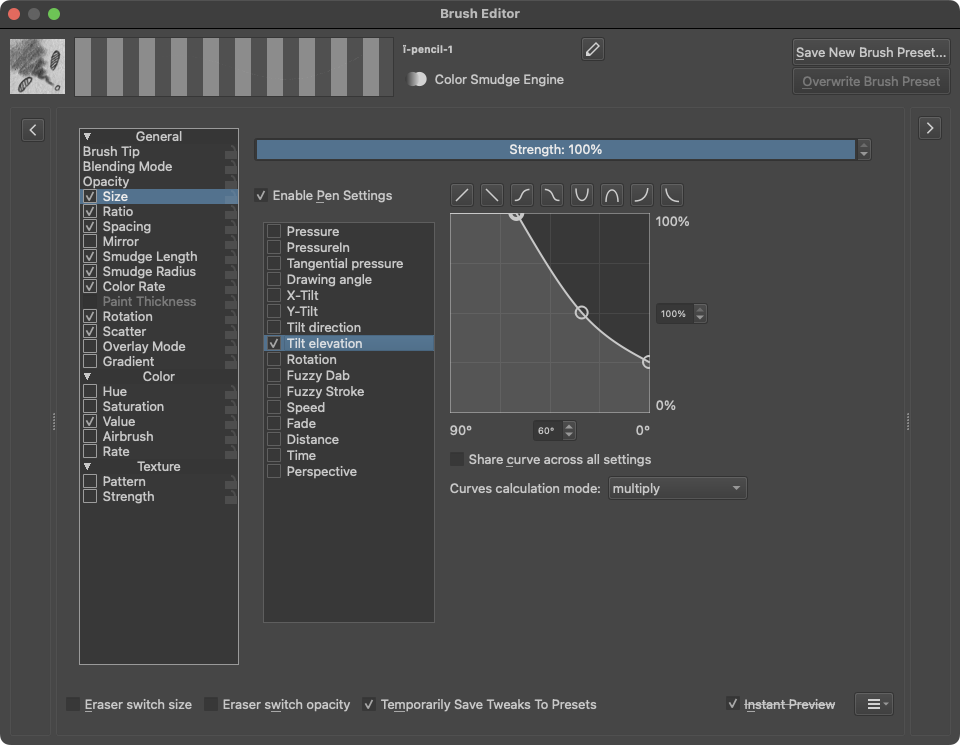
General > Size
Considering that "General > Ratio" changes only length of the brush tip shape as smallest state, we get squarish shape which gives ~12px stroke width. And this is too width.
So we are going to control the size of the brush tip shape as well, but in a bit tricky way. For this purpose, we are also using "Tilt elevation" sensor.
The smallest stroke width I want to achieve is 3px, so from 0° to 30° stroke size will transfer from 100%/(12px/3px) = 25% to 50% (6px).
And from 30° to 60°, stroke size will be transferring from 50% (6px) to 100% (12px).
General > Spacing
There are "Spacing" settings in the "Brush Tip" section, but it has a fixed ratio for more global patterning. This section allows us to tweak spacing more precisely with the usage of sensors.
Make sure that "Isotropic Spacing" option unchecked. This is necessary so that the spacing calculation starts from the edges of the brush tip shape, and not from the edges of the brush tip square.
By settings "Strength" we define the percentage of spacing that we set in the "Brush Tip" section. It was 1.00 so by setting 50% it means that maximum spacing will be 1/100%*50% = 0.5. But this is the max value.
So we are going to use the same "Tilt elevation" sensor with the same curve as in "Ratio" section to define spacing from ~0.01 to 0.50 regarding the angle of inclination.
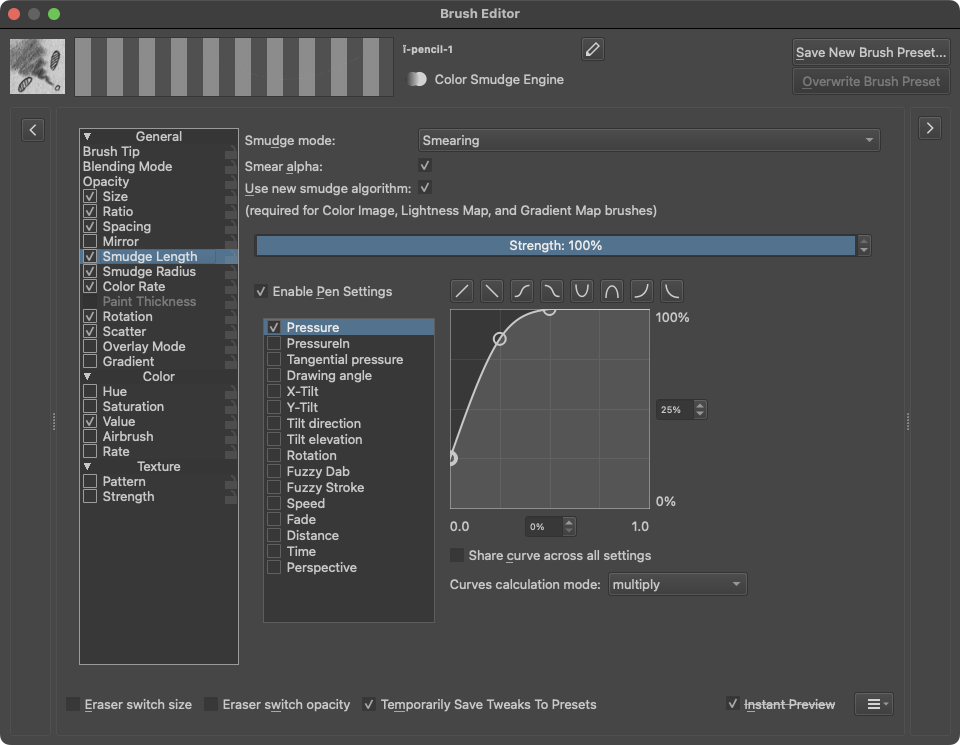
General > Smudge Length
This is the main section when we can define way of smudging of charcoal pigment.
Make sure you are in the "Smearing" mode.
"Smear alpha" also need to be activated.
Charcoal pencil has a tendency to smear with pigment without significant pressure. Select "Pressure" sensor and adjust curve to achieve an aggressive smudge effect even barely touching the surface.
At first, I was not so pleased with "new smudge algorithm". It seemed broken to me. But after some investigation, I figured out how it works. So, considering that it is "new"... we are going to use it. But we will see effect from these settings during setup in upcoming settings sections.
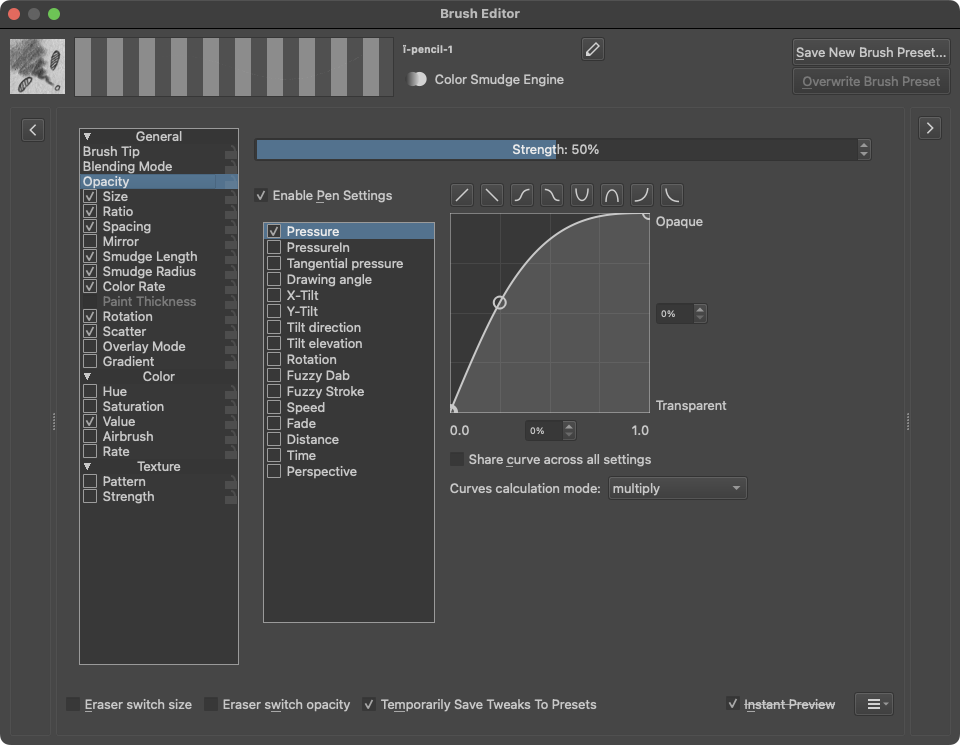
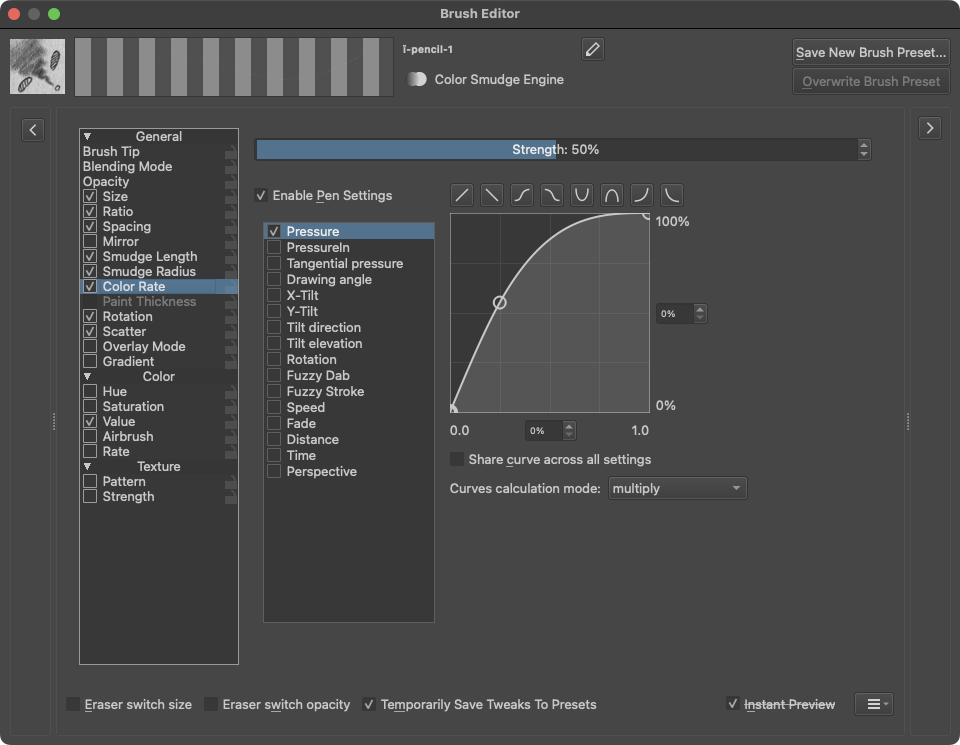
"General > Opacity" and "General > Color Rate" take effect on each other a lot. In the old algorithm version, "General > Smudge Length" was also part of this dependency, but in the new one it becomes more simple.
Considering that charcoal is a pretty soft media, the pressure exponential curve will be steep. Both setting sections balance each other, so we are starting from a max value of 50% and same curve parameters. After this, let's tweak of their max value by increasing it for one and accordingly decreasing it for another, and so on.
For now, the provided settings work the best for the purpose of charcoal pencil. In the future, I am going to tweak and update them once learn more about algorithm logic.
General > Opacity
"Opacity" affecting how much pigment will be taken for smudging.
General > Color Rate
"Color Rate" is for compensating value.
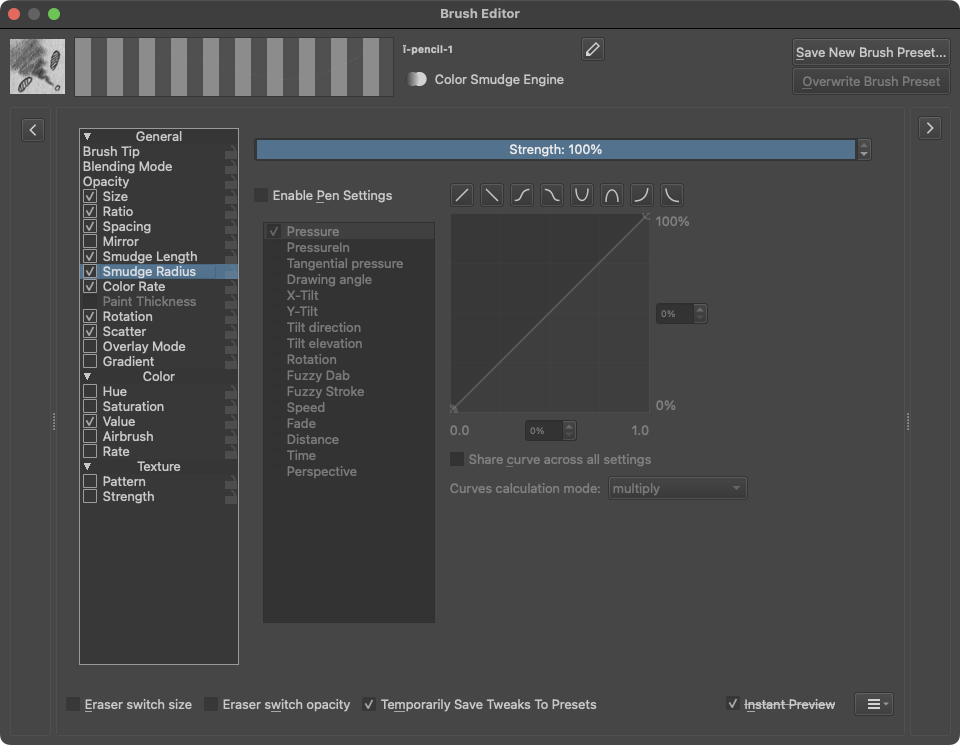
General > Smudge Radius
We are using a tip shape with a small sampling area, so for this section I am setting a constant value of 100%.
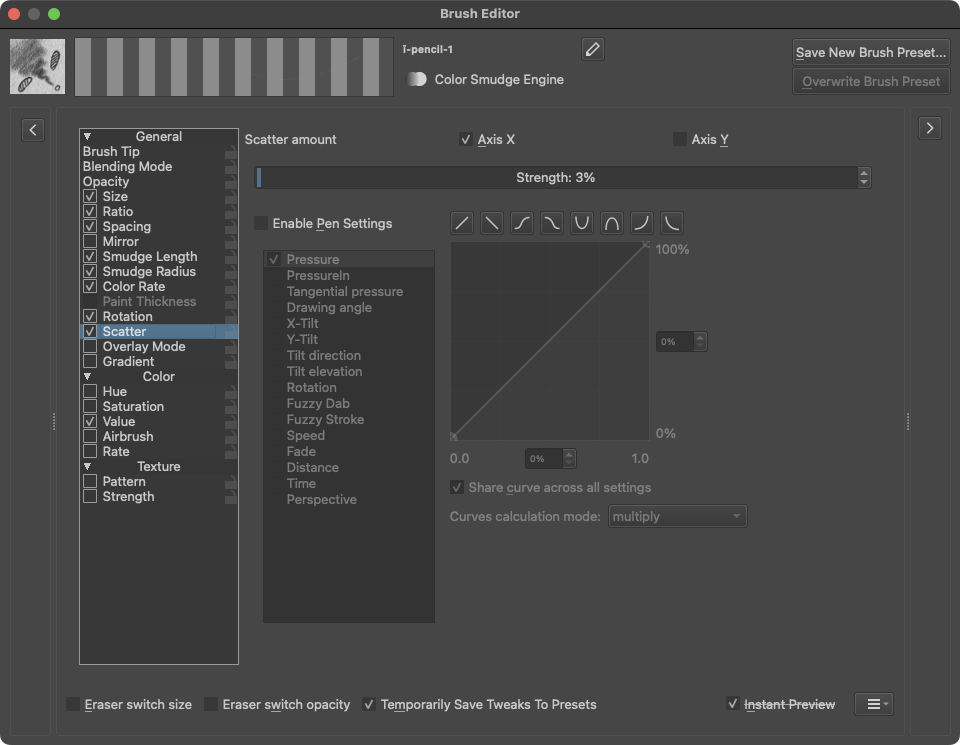
General > Scatter
A simple smudging effect implemented by sampling of color from one brush tip shape spawn and transferring with amount of value to the next brush tip shape spawn. By scratching over the same area several times, we can see how a bunch of pixels wobbling here and there, and it looks unnatural. By applying of "Scatter" effect, we are adding a small amount of randomization to the brush tip shape spawn position, so it makes smudging looks much more natural.
We are going to scatter along stroke movement direction, so select only "Axis X" scattering.
In this section, "Strength" parameter relates to the longest brush tip shape length on every side along the selected axis, so even a small amount already will be noticeable. In this particular case, 3% works perfectly. It brings just the right amount of brush tip shape spawn position deviation without making strokes look inaccurate.
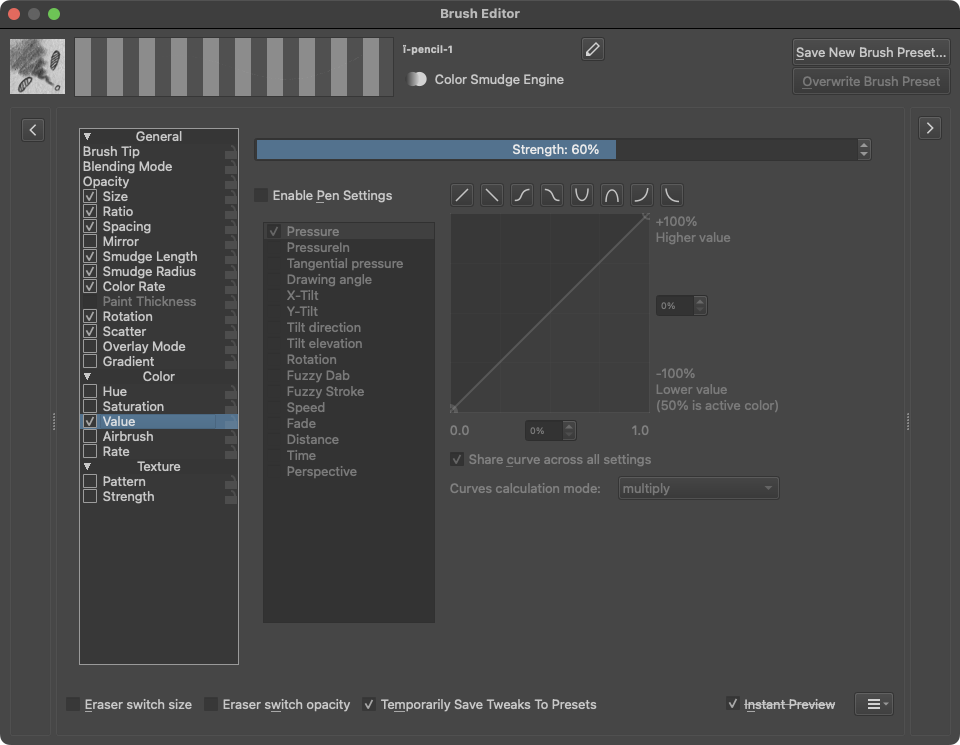
Color > Value
With this setting, I am going to limit the global value for this brush to prevent it from reaching an unnatural 100%. Because we already have a few settings where we are balancing opacity, here we need to set the fixed value of “Strength” to 60%.
Texturing
At this point, our brush acts a lot like real charcoal pencil, but without texturing all outlines along with other digital artifacts are visible and overall brush looks like a some raw digital thing. So now we are going to implement texturing effects.
For this purpose, in most brush engines we have "Texture > Pattern" section. But the problem is, that if we are applying texture to the brush itself, all transformation like smudging will affect the texture look as well. In the case of charcoal pencil and paper, pigment particles just change position on the paper surface, but not change the structure of this paper.
So, if we want to get natural texture effects, we need to apply texture to the paper and not to the brush.
Some time ago, I bought a piece of high-quality drawing paper, took several photos with a nifty-fifty lens, cropped the center of the photo to avoid any possible vignetting side effects and used a mirroring technique to create seamless texture. Furthermore, I adjusted curves to get contrast of this texture about right to use for our purposes.
Once you create a new "Krita" document, you have two default layers: "Background" and "Paint Layer 1".
Create an additional "Fill Layer" with "Pattern" of provided paper texture.
Make sure the new "Fill Layer" is at the top of other layers.
Change the blending mode of this "Fill Layer" to "Overlay".
Select "Paint Layer" as an active layer to draw.
Now both drawing media and drawing surface are prepared for drawing.
In addition, you can achieve maximal realistic effect by adding one more "Fill layer" with saturation <25% and value >75% and any hue you want beneath "Paint Layer". Let's call it "Base Color". Thus, the paper texture will be visible over the entire area of the canvas.
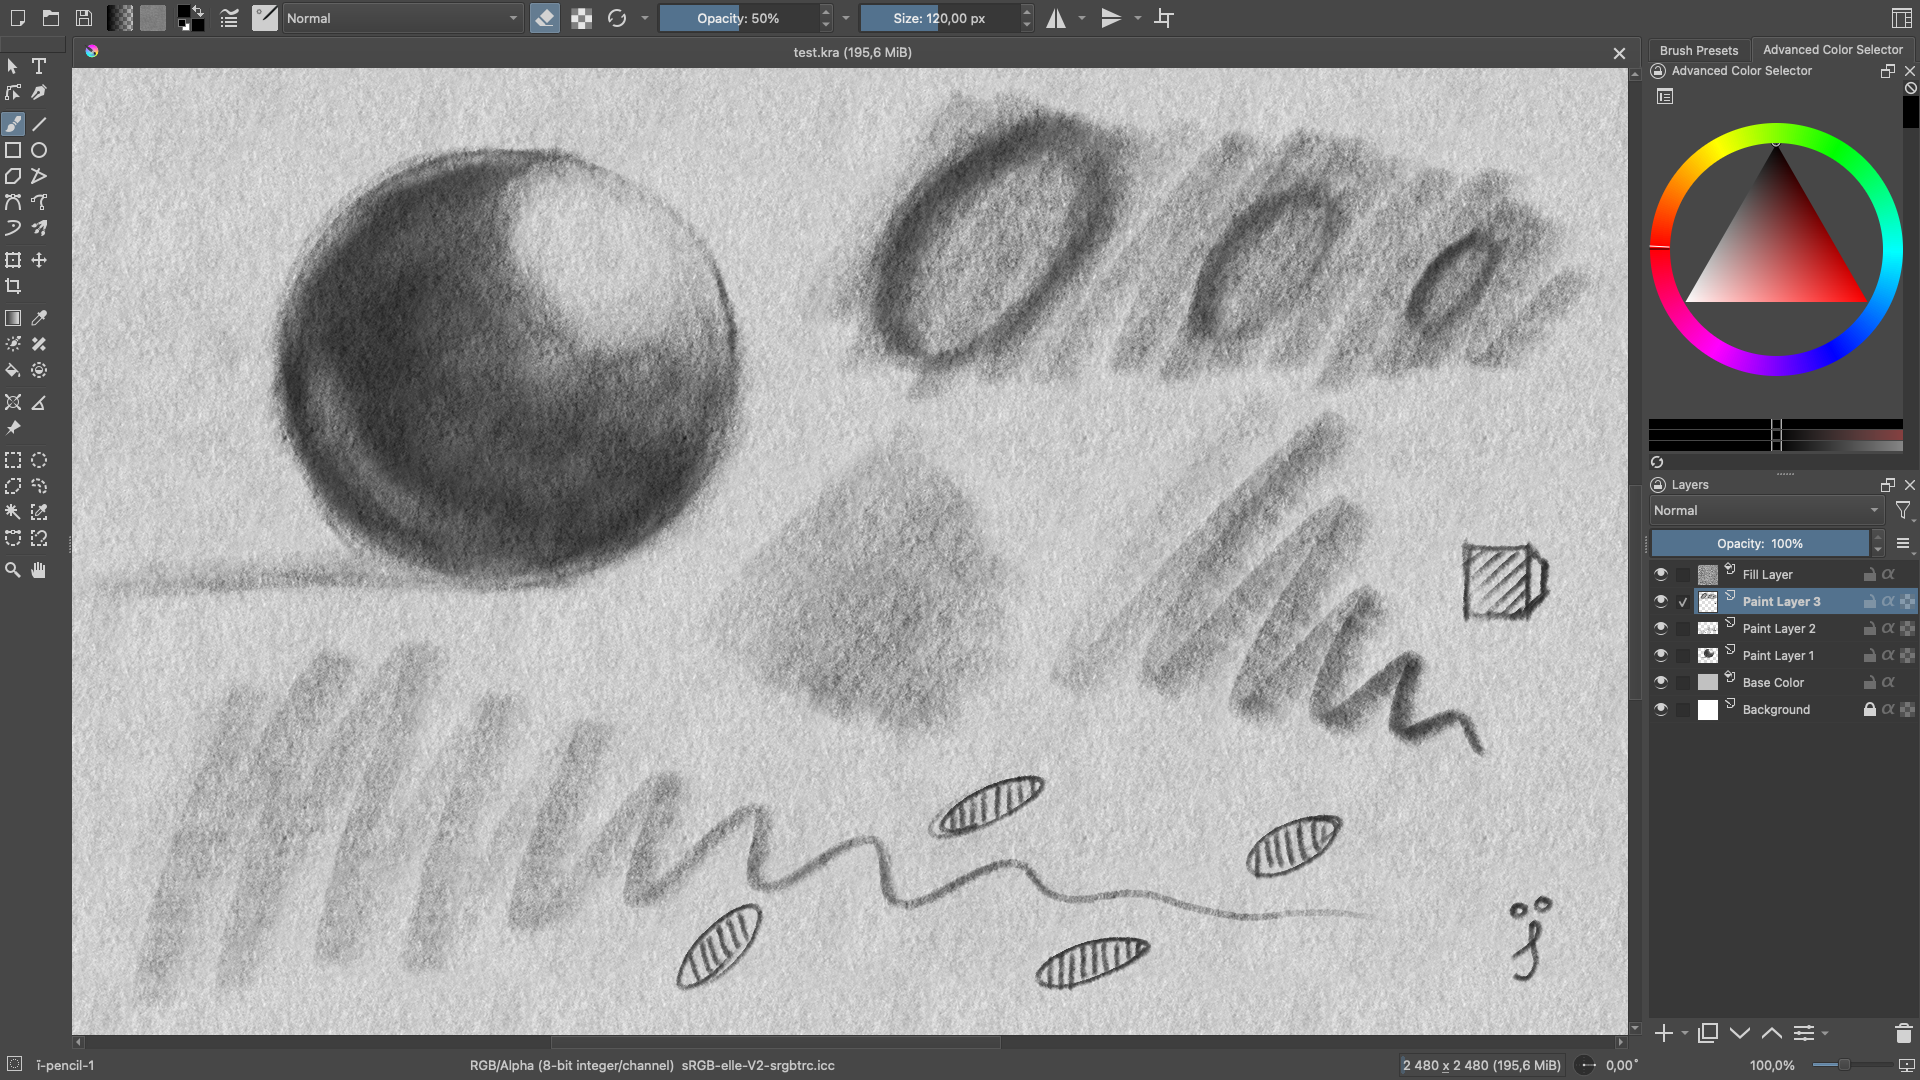
Demo
In the future, when I will improve this brush and maybe add some more to the bundle, I will record a video demo, but for now here is some screen of the result.
Download
Here you can download the latest version of created brush. I will update this article time to time with more brushes, along with an updated version of the old one.

Conclusion
I created this topic to explain the brush creation process in "Krita" without abstract examples and with the particular goal of emulating charcoal pencil drawing process. For sure, I still do not know a lot about brush engines in "Krita" but I hope this article will get in use by people who are only trying to figure it out from scratch by themselves... like I did.
Thanks for reading and happy drawing.
Ah, yes... if you like the "Krita", support the creators with a donation. They are doing outstanding things and deserve recognition.
Created by TennojiM
All rights reserved
© 2026
All rights reserved
© 2026