PROLOGUE
In this article I want to tell you about one of the advance media stacks to watch video on your PC.
In this build I'm trying to avoid all unnecessary data processing hops to increase processing speed and reduce letencies and it will help to bring media content on your screen as closer to the original as it's possible with less compressings, transformations, corrections... etc. Basic idea here if you do not know for what it is better turn it off. Also this guide will help you to dive into ocean of high quality video playback with all this acronyms and preferences which we are usually prefer to do not touch and to use VLC Player instead... lol.
This is just one of the examples and it doesn't claim to be perfect or only one right. This is just a base for you. Most of this options are very subjective because everybody have their personal preferences, but anyway some point's are very preferable to be turned on or turned off, so let's go through my setup and I will try to explain as much as I can and as much as I know by myself. But I need to warn you that like for most such setups something can go wrong on different OS or hardware so you and only you responsible for your actions.
So let's start!
PREPARATION
Typical media stack can be divided into these steps: Player > Splitter > Filter > Renderer.
So let's decide and download all this ingredients for media stack.
DAUM PotPlayer - one of the coolest players on the market made by Korean studio "Kakao". It's convenient to use and flexible to modificate. Also it's completely free.
LAV Filters - - most complete and up to date open-source pack for splitting and decoding audio and video streams. Guy with nickname "Nevcairiel" and community doing really great job.
madVR - complete solution that includes best algorithms to increase quality of video stream. It's done buy guy with nickname "Madshi" and highly supporting with community. It's a heavy but precious gem.
XySubFilter - advanced filter for subtitle processing that supported by user with name "Cyberbeing" in collaboration with "Madshi".
For ASIO I created separate chapter in this guide because it's very optional and specific.
INSTALLATION
Please pay attention that I'm performing all installations and launches under administrator rights: Right click on the file you want to launch > Run as administrator.
Installation of DAUM PotPlayer is pretty simple. After installation it will ask you for additional downloads of OpenCodec pack. Originally it was integrated in PotPlayer directly but after time it was separated due to some license problems. We are going to use LAV Filters, so not need in OpenCodec here.
Same story with LAV Filters installation - it's pretty simple to do. Installing only x64 versions. Also do not forget to set check-boxes near all possible formats to support.
For madVR this process is a little bit different. We have archive that firstly need to be unpacked and copied in your "Program Files" folder. After this you can execute "install.bat" file inside this folder. If in the end you see cmd window with "Installation succeeded." you can be sure that installation passed without problems.
XySubFilter installation process is the same to madVR - we need to unpack archive and copy in your "Program Files" folder. After this you can execute "Install_XySubFilter.bat" file inside this folder. If in the end you see cmd window with "Installation succeeded." you can be sure that installation passed without problems.
Here it is! We've installed everything we need.
SETUP
1. Disabling default player transformation and splitting
To avoid any unnecessary hops and data transformation first at all let's disable default built-in transform filters in player.
PotPlayer > [RMC] > Preferences > Filter Control
In "Video Transform Filter Usage" dropdown select "Disable" option.
Uncheck "Use Built-in Audio transform Filter" check-box.
Uncheck "Use Built-in Audio Stream Switcher" check-box.
Uncheck "Use Built-in Audio Stream Switcher (Alternative)" check-box.
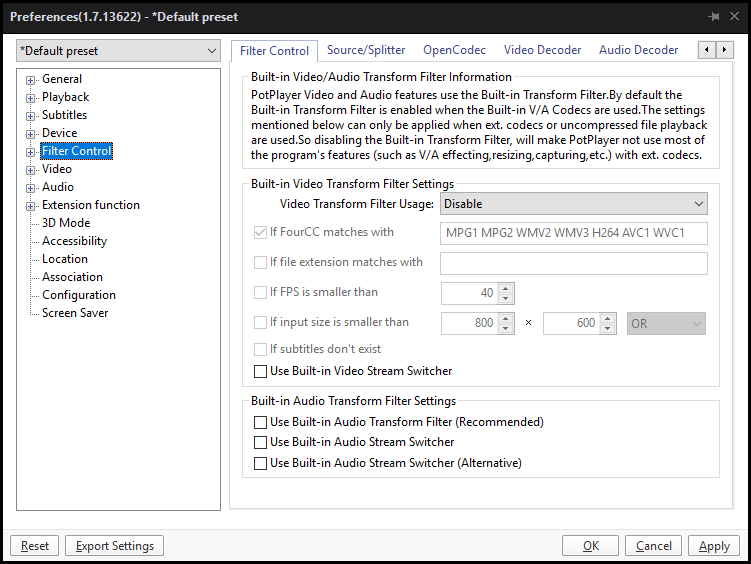
Apply > OK
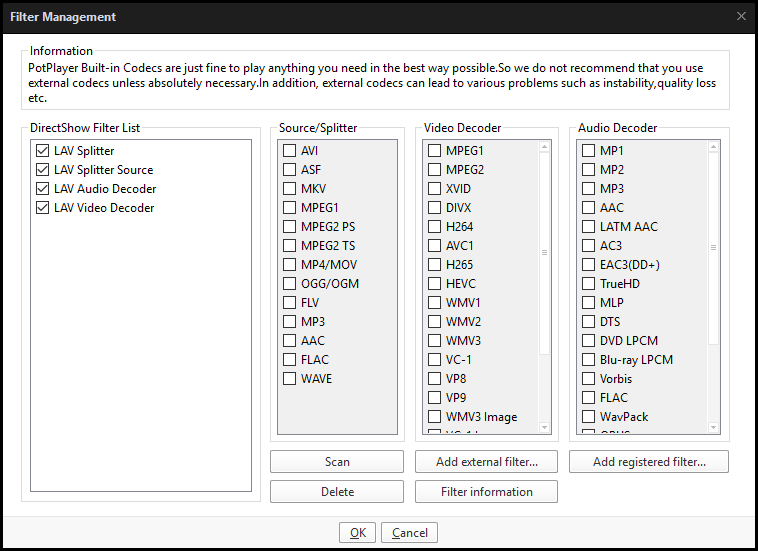
2. Passing transformation and splitting to LAV Filters
Let's add LAV Filters in the filter list one by one.
PotPlayer > [RMC] > Preferences > Filter Control > Source/Splitter > Filter Management
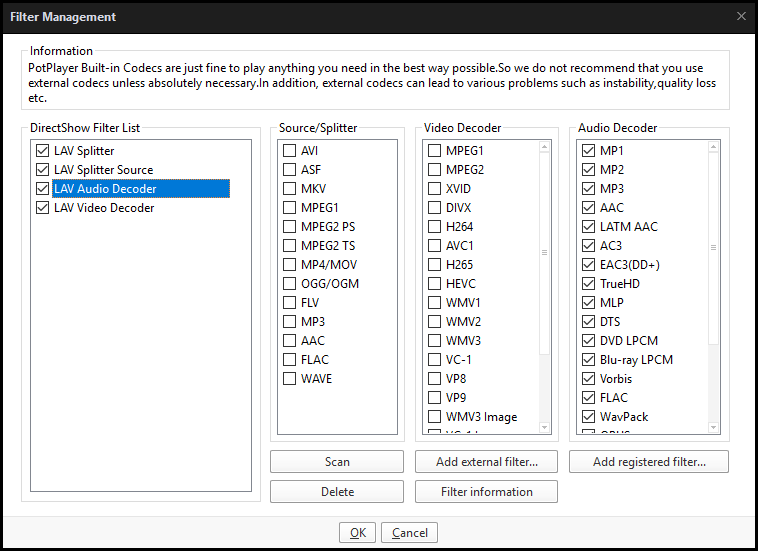
Press on "Add registered filter..." then select "LAV Splitter" and hit "OK".
Press on "Add registered filter..." then select "LAV Splitter Source" and hit "OK".
Press on "Add registered filter..." then select "LAV Audio Decoder" and hit "OK".
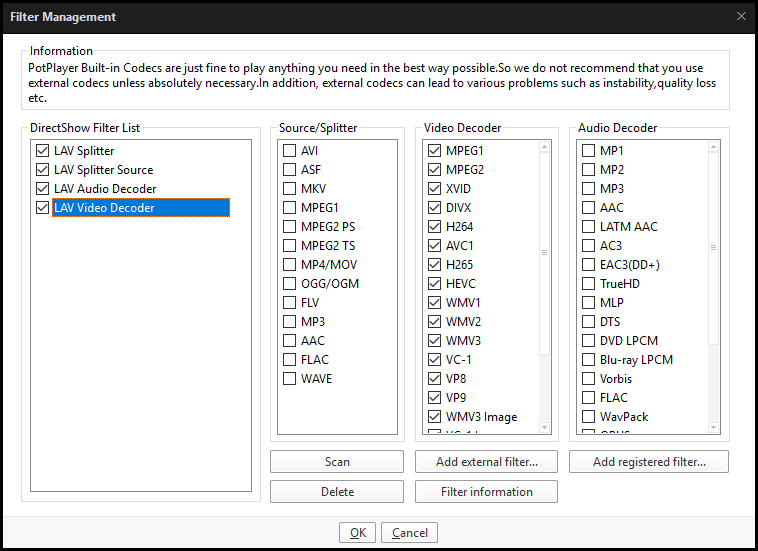
Press on "Add registered filter..." then select "LAV Video Decoder" and hit "OK".
Make sure all 4 filters now in "DirectShow Filter List" and only them. Also make sure check-boxes near them are chacked.
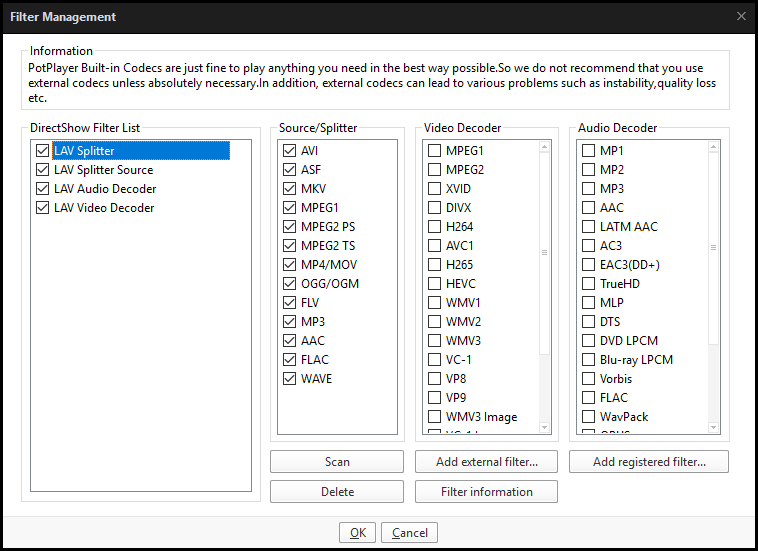
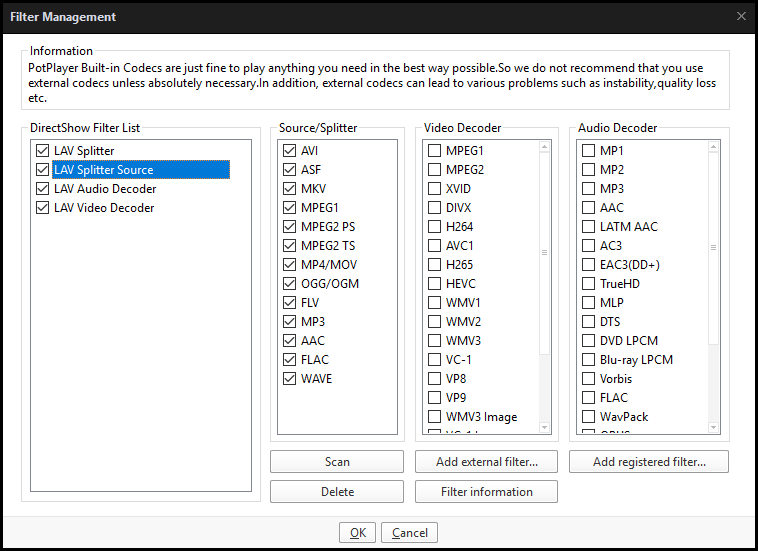
Now we need to associate every of them with proper source types.
Select "LAV Splitter" in "DirectShow Filter List" by pressing on it and check every check-box in "Source/Splitter" list.
Select "LAV Splitter Source" in "DirectShow Filter List" by pressing on it and check every check-box in "Source/Splitter" list.
Select "LAV Audio Decoder" in "DirectShow Filter List" by pressing on it and check every check-box in "Audio Decoder" list.
Select "LAV Video Decoder" in "DirectShow Filter List" by pressing on it and check every check-box in "Video Decoder" list.
Press "OK".
Apply > OK
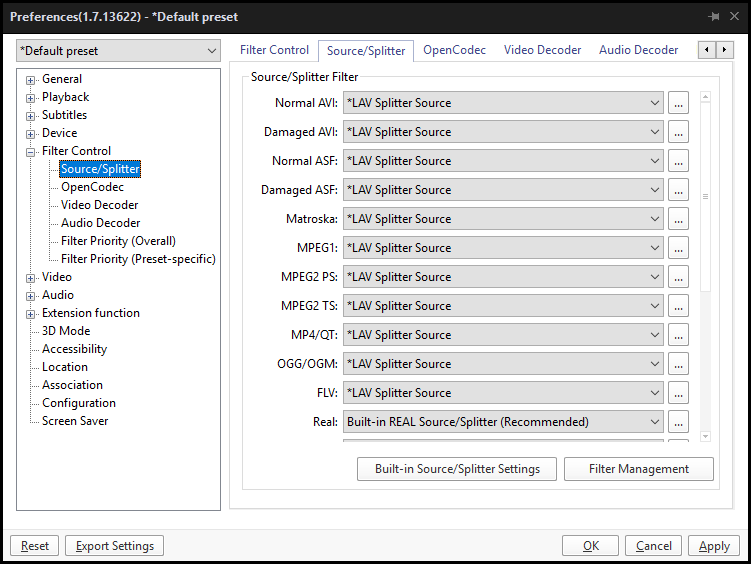
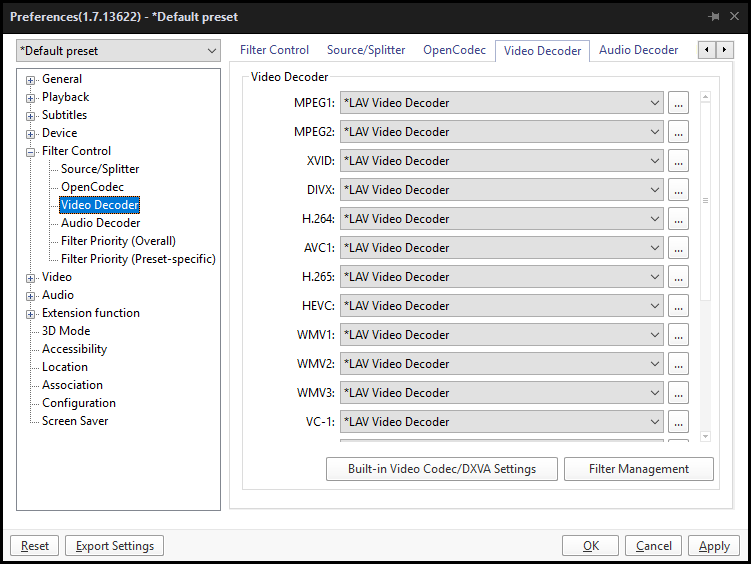
After this we need to go through 3 source tabs and select associated previously LAV Filters for every possible source.
PotPlayer > [RMC] > Preferences > Filter Control
Open Source/Splitter tab. Go through all "Source/Splitter Filter" list items and select "LAV Splitter Source" in the dropdowns if it's possible.
Open Audio Decoder tab. Go through all "Audio Decoder" list items and select "LAV Audio Decoder" in the dropdowns if it's possible.

Open Video Decoder tab. Go through all "Video Decoder" list items and select "LAV Video Decoder" in the dropdowns if it's possible.
Apply > OK
And finally we are going to set global priorities for filters.
PotPlayer > [RMC] > Preferences > Filter Control > Filter Priority (Overall)
Press on "Add registered filter..." then select "LAV Splitter" and hit "OK".
Press on "Add registered filter..." then select "LAV Splitter Source" and hit "OK".
Press on "Add registered filter..." then select "LAV Audio Decoder" and hit "OK".
Press on "Add registered filter..." then select "LAV Video Decoder" and hit "OK".
Make sure all 4 filters now in "Custom Filter Manager" list and only them. Also make sure they are in the right order. If no, you can manage them with "Up" and "Down" buttons on the right side panel.
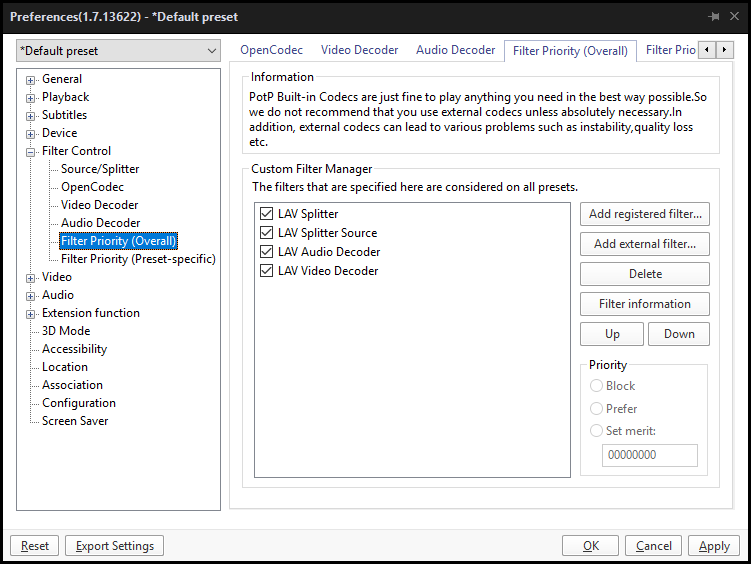
Apply > OK
Now by default LAV filters are the main middleware that responsible for media transforming and decoding.
3. Audio rendering setup
At this point of setup better to use WASAPI because this option not layered and has less latency against DirectSound. Overall sound also better if you are using native Windows audio engine.
PotPlayer > [RMC] > Preferences > Audio
Audio Renderer: Built-in WASAPI Audio Renderer
Channel mixing will be on the shoulders of LAV Audio Decoder so...
Speakers: Same as input | 32-bit (floating point)
Uncheck "Expend stereo to center" check-box.
Uncheck "Expend stereo to surround" check-box.
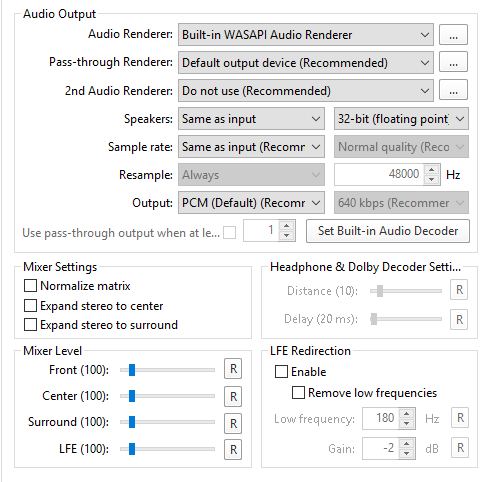
Apply > OK
I'm also disabling normalizer just in case. Anyway this item not taking effect because as you remember we are disabled all built-in transformations but still.
PotPlayer > [RMC] > Preferences > Audio > Normalizer/Freeverb
Uncheck "Enable" check-box.
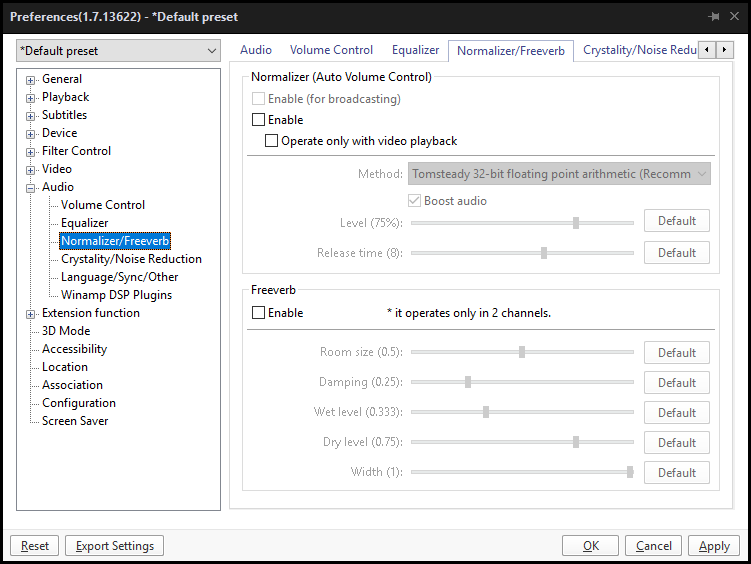
Apply > OK
4. Video rendering setup
As I said, we disabled all internal transformations, so only one thing that we need to do - select MadVR as a main renderer for video stream.
PotPlayer > [RMC] > Preferences > Video
Video Renderer: Madshi Video Renderer
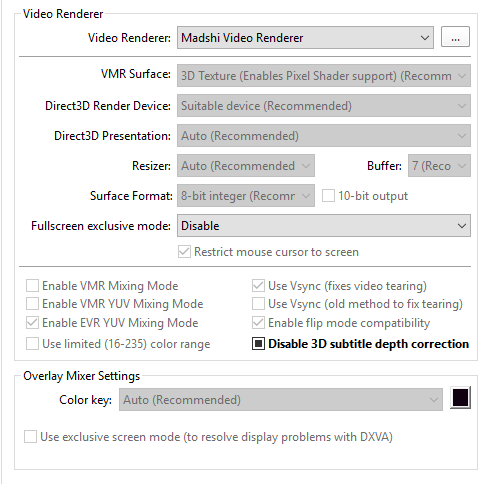
Apply > OK
Yes... that's all)
5. LAV Audio Decoder setup
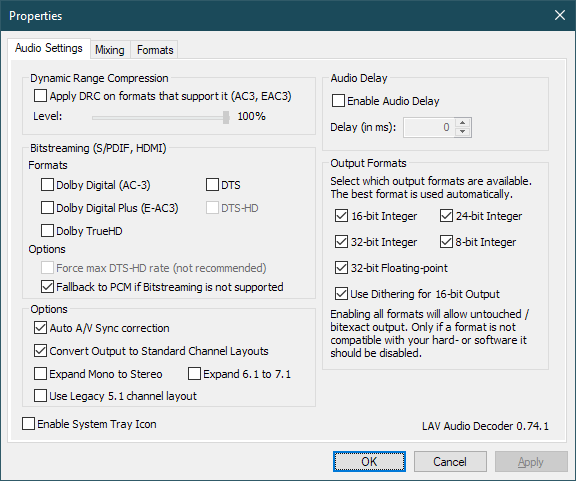
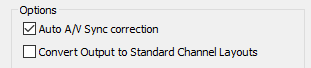
LAV Audio Configuration > Audio Settings
Check "Auto A/V Sync correction" check-box. It will help you to keep video and audio in sync even in case of frame-drop.
Check "Convert Output to Standard Channel Layouts" check-box. If converts all non-common channel layouts to more common such as 5.1, 6.1, 7.1.
Leave "Enable Audio Delay" check-box unchecked.
Overall just make sure it looks like on the screen.
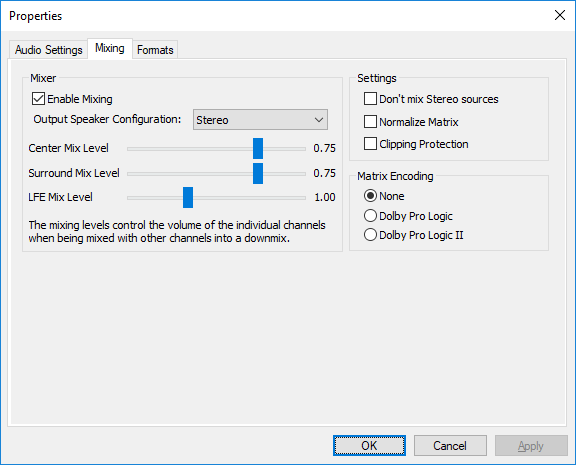
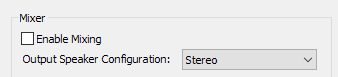
LAV Audio Configuration > Mixing
Check "Enable Mixing" checkbox.
In "Output Speaker Configuration" you can set what speaker layout you have. In my case it's "Stereo" because I'm using DAC/AMP combo with headphones.
"Center Mix Level", "Surround Mix Level" and "LFE Mix Level" sliders are responsible for the intensity of involvement of sound channels in the down-mix stream. Feel free to play with it and found proportion that sounds to you in the best way or just use mine... or even default.
"Don't mix Stereo sources" checkbox doing exactly what it's name means.
"Normalize Matrix" and "Clipping Protection" is quite opposite options. I prefer to have them both unchecked.
Anyway just look at the screen.
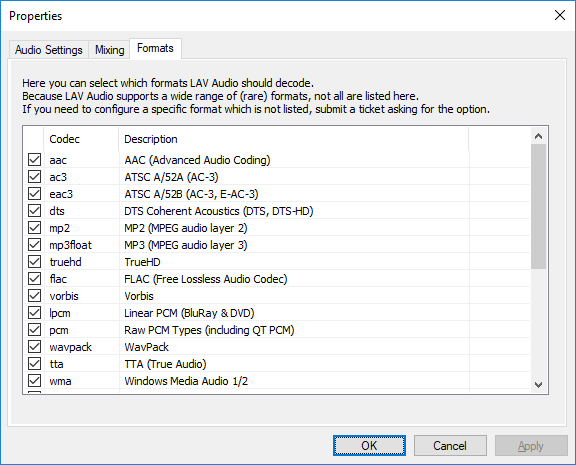
LAV Audio Configuration > Formats
Here just check all possible formats in the list.
6. LAV Video Decoder setup
LAV Video Configuration > Video Settings
Select "D3D11" in "Set Hardware Decoder to use" dropdown.
Leave "Hardware device to use" dropdown in default state - "Automatic (Native)"
This two options allows you to use your GPU for video processing and keep very high performance level.
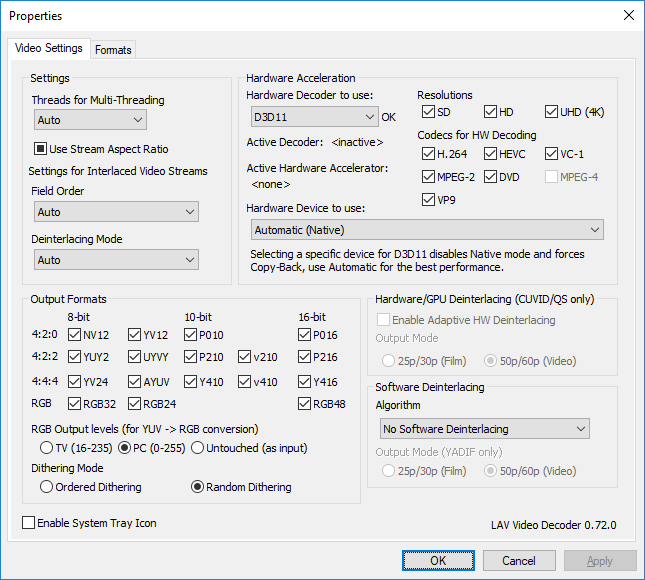
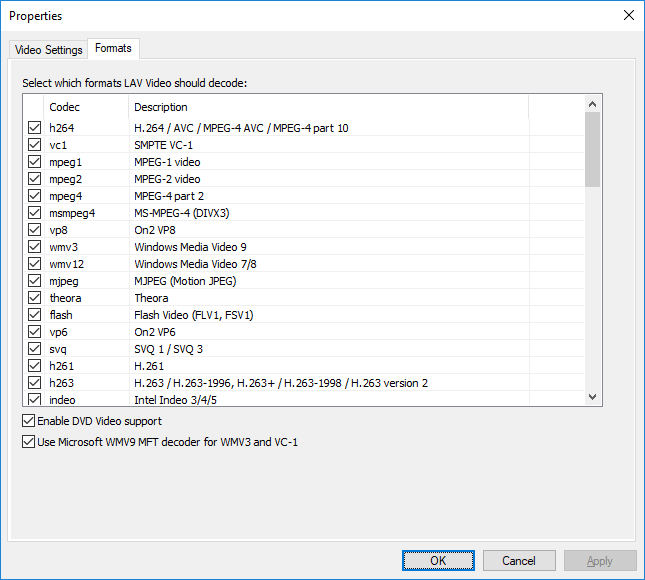
LAV Video Configuration > Formats
Here just check all possible formats in the list.
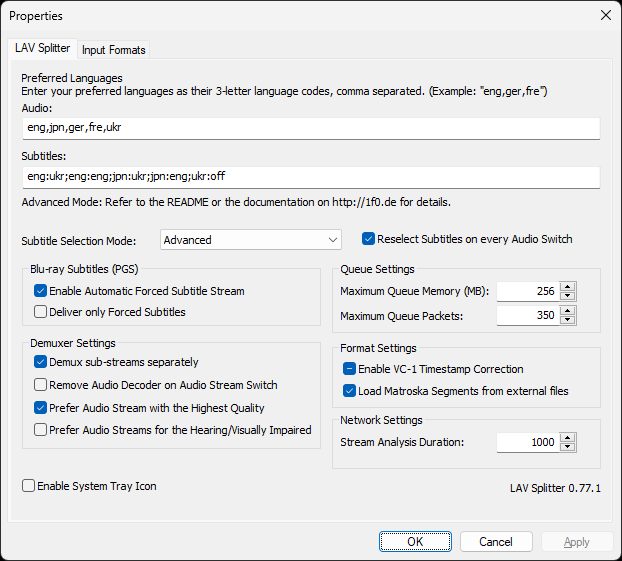
7. LAV Splitter setup
LAV Splitter Configuration > LAV Splitter
Here almost everything remains the same. You can tune your personal preferences in automatic audio stream selection and relations between audio and subtitles. You can read more about this
here.
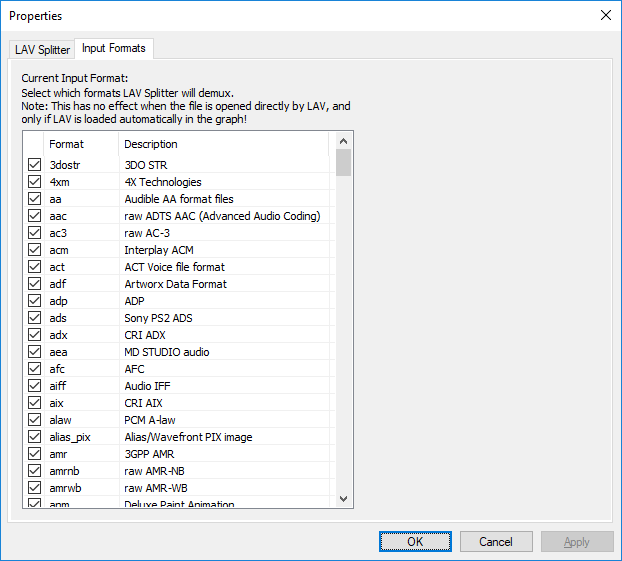
LAV Splitter Configuration > Input Formats
Here just check all possible formats in the list.
8. MadVR setup
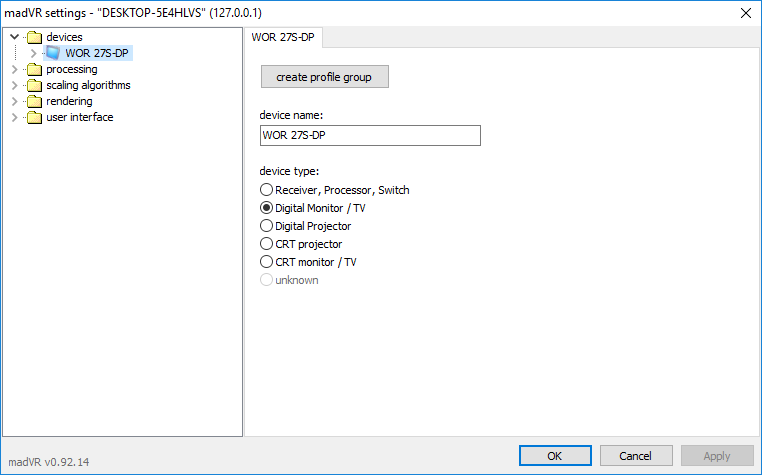
MadVR > devices
Select your display.
Select radio-button with particular type of your display.
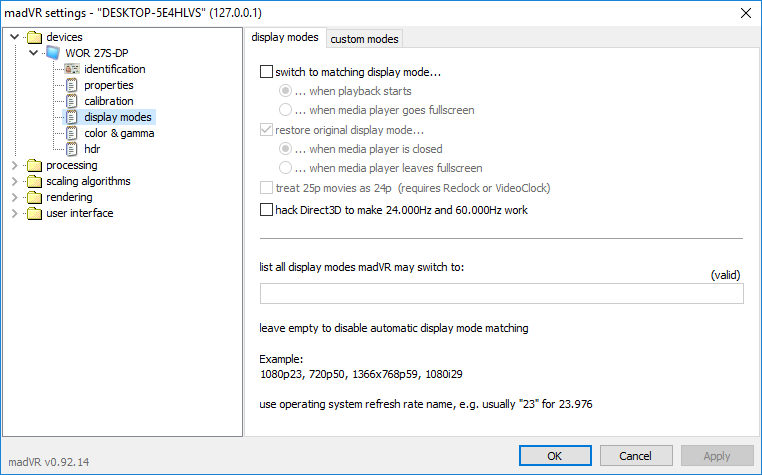
MadVR > devices > display modes
We do not need to switch your monitor scanning mode to fit video frame rate.
Untic "switch to matching display mode..." check-box.
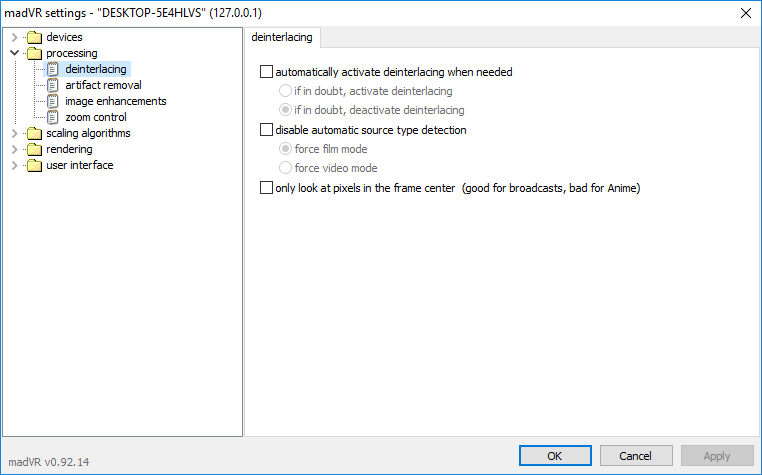
MadVR > processing > deinterlacing
Disable deinterlacing options.
I prefer to disable deinterlacing options.
Untic "automatically activate deinterlacing when needed" and "only look at the pixels" in the frame center check-boxes.
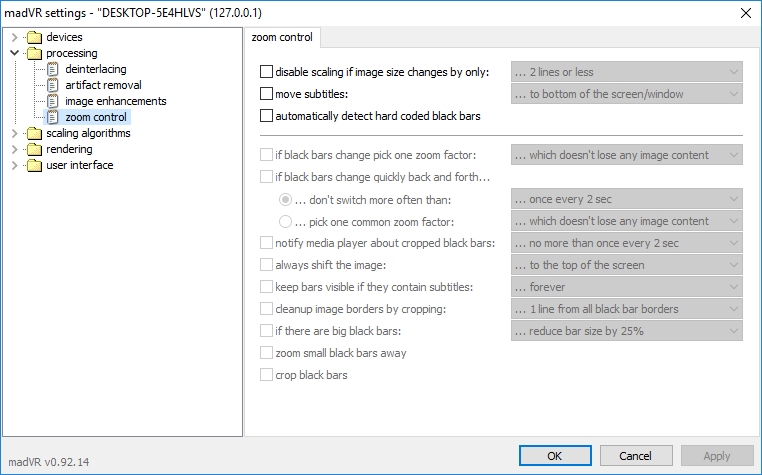
MadVR > processing > zoom control
I prefer to disable this stuff also, because it's kinda rare situation when you have video not fitted common standards.
Untic "disable scaling" and "move subtitles" options.
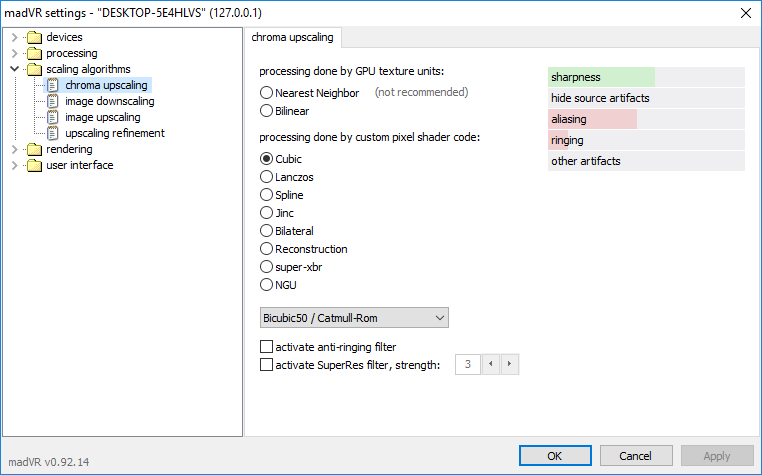
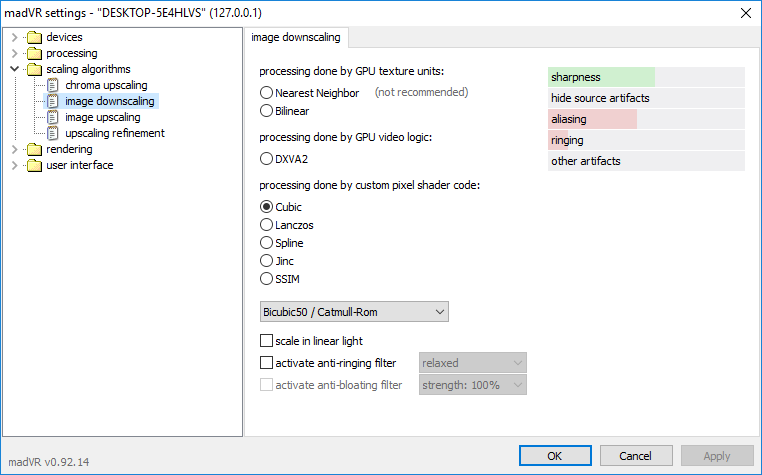
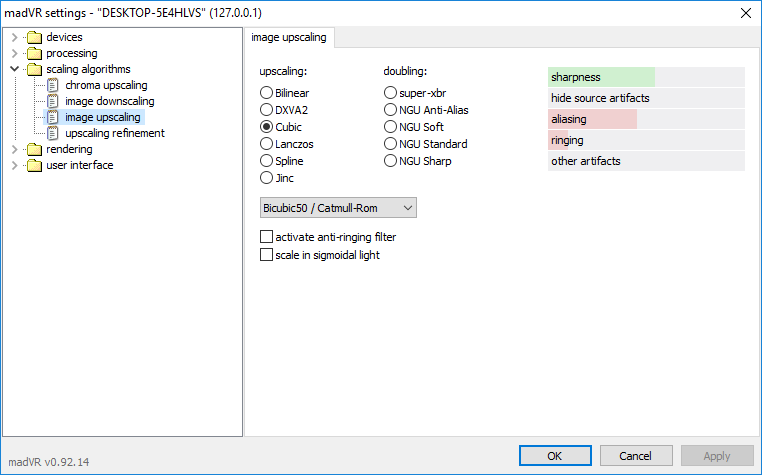
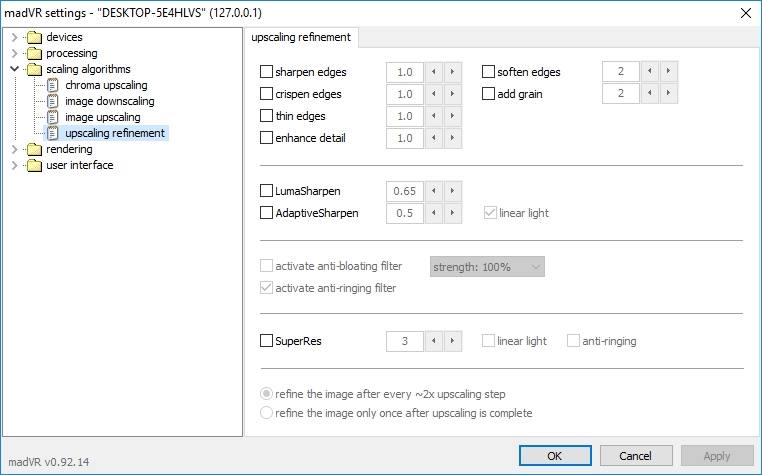
MadVR > scaling algorithms > *
This is the most subjective part. All people have their preferences in what scaling algorithms to use. You can read about it all over the Internet. I prefer to use simple algorithms with soft effect and strict processing without predictions (Cubic - Catmull-Rom).
MadVR > rendering > general settings
We are going to push your hardware to the max!
Check "enable automatic fullscreen exclusive mode". In the latest Windows 10 builds "exclusive mode" crashes was fixed. So lets enable it as well.
Check "use Direct3D 11 for presentation" to use advance DirectX 11 instead old DirectX 9.
Check "present a frame for every VSync" to force presenting additional frame in advance for vertical synchronization.
Check "use a separate device for presentation" and "use a separate device for DXVA processing". Somehow it improves performance.
Pushing "CPU queue size" and "CPU queue size" to the max value can cause payer to hang during interaction with video time line. Just play with this setting and decide optimal value. For me 8 works just fine.

MadVR > rendering > windowed mode
Check "present several frames in advance" and select max value in "how many video frames shall be presented in advance" dropdown. It will help to handle unexpected playback juggling.

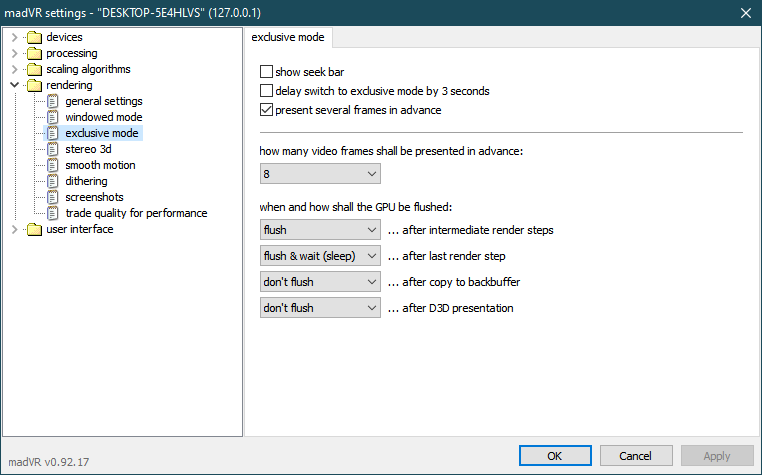
MadVR > rendering > exclusive mode
Check "present several frames in advance" and select max value in "how many video frames shall be presented in advance" dropdown. It will help to handle unexpected playback juggling.
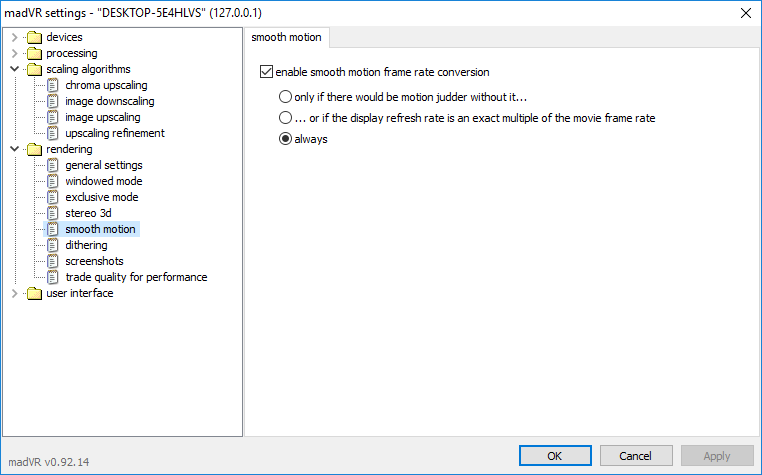
MadVR > rendering > smooth motion
This engine is not actually smoothing video playback. It handles every second juggling in playback because of multiply differences in monitor refresh rate and video frame rate. So I prefer to set it turned on.
Check "enable smooth motion frame rate conversion" check-box and select "always" radio-button.
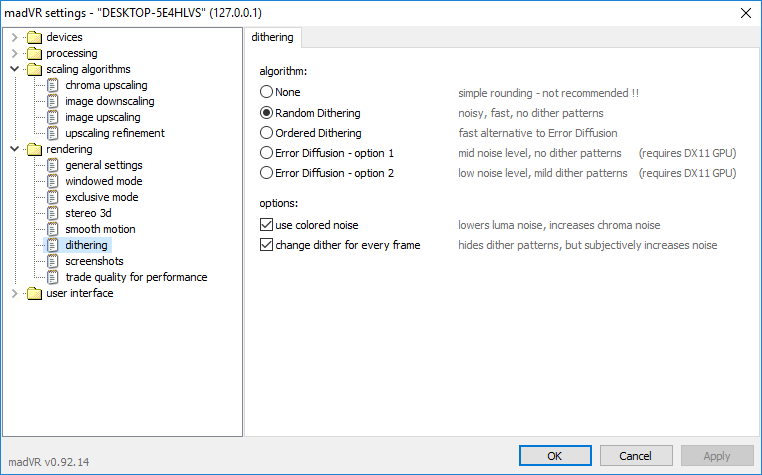
MadVR > rendering > dithering
This is also very subjective range of options. I prefer to see soft noise without fixed patters, so for me it looks like this.
Select "Random Dithering" radio-button as algorithm and check both "use colored noise" and "change dither for every frame" check-boxes.
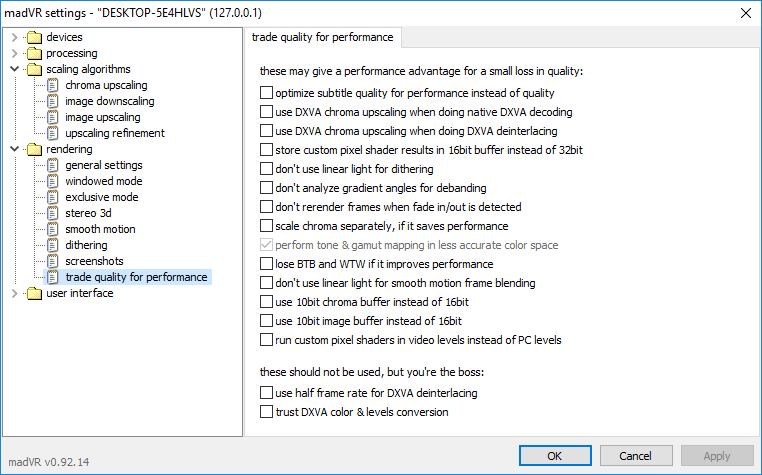
MadVR > rendering > trade quality for performance
I prefer to avoid all this specific options. As soon as I find something interesting, I will update this guide.
For now just uncheck all available check-boxes to avoid artifacts, etc.
Apply > OK
9. XySubFilter setup
Actually there is no need to do something here. All this default settings are optimal to use. Overall subtitle rendering in this case happens thru MadVR renderer. Once I found something I will add it here.
ASIO audio renderer integration
And finally ASIO. This sound protocol is mostly popular among sound editors, because of low latency and extremely clean reproduction. But we will use it for sound rendering in our neet media stack. Only one disadvantage of ASIO that it can handle only one audio stream from only one program at the same time - it means that during media playback you will hear sound only from PotPlayer. This part of setup is optional, because usually WASAPI is pretty enough to get good quality sound, but if you want to have complete control over all aspects of media playback you can try this.
If your sound card natively supports ASIO - good, but if no, first at all we need to download and install
ASIO4ALL driver.
The next problem is that you can't just select ASIO4ALL in PotPlayer preferences because you need multichannel support. Michael Buchberger did an amazing job creating
Multichannel ASIO Renderer driver.
.
Previously it was pretty raw project that was alive all this time only because of bare enthusiasm and donations. But currently I see that it was drammatically updated and latest version available it trial and paid licensed versions. I did my donation long time ago and I definitelly going to buy licensed version. With trial you can check if it will work for you. But for me his solution works perfectly.
After installation of Multichannel ASIO Renderer we need to set it as main audio renderer in PotPlayer.
PotPlayer > [RMC] > Preferences > Audio
Select "Multichannel Asio Renderer Filter" in the "Audio Renderer" dropdown.
You can leave other setting as it is.

Apply > OK
Now we need to select ASIO4ALL driver as an output for multi channel rendering.
PotPlayer > [RMC] > Filters > Multichannel Asio Renderer Filter > Drivers
Select "ASIO4ALL" in the "Audio-Driver for output" dropdown.
Select maximal samplerate that your output audio device possible to reproduce in the "Output samplerate" dropdown. I'm using toslink S/PDIF connection with my DAC so maximum for me is "96000".
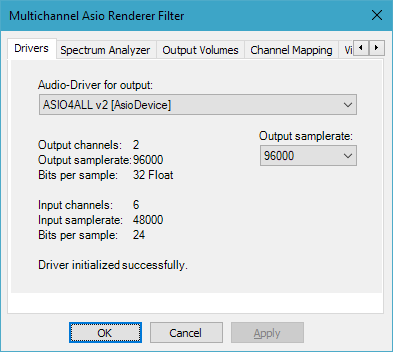
Apply > OK
As I said previously ASIO can handle only one sound stream from only one program at the same time so please be sure you are completely close programs like "Spotify" to avoid situation when they are pull the blanket over themselves.
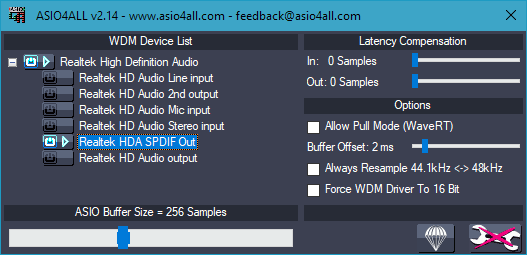
So now let's run test video. ASIO4ALL icon should appear in the taskbar.
Open ASIO4ALL setting by pressing on it.
Now we need to stop video playback to get possibilities to change settings and select audio playback device from the list.
Select your playback device from the list.
"ASIO Buffer Size" allows you to control bitstream flow to choose optimal settings for your device. Less samples can cause sound jitter, more samples means bigger latencies.
Set "ASIO Buffer Size" slider to optimal value. For me "256" works pretty well.
Also set "Buffer Offset" slider to "2 ms" to avoid micro ticking.
Now you can restart test video playback to check if everything works fine. In the end you should see something like this.
Most of the time I'm using stereo headphones and when I'm playing video with multiple audio channels I prefer to have complete control over their mapping.
If you too, firstly you need to disable mixing on LAV Audio Decoder to pass all channels directly to Multichannel ASIO Renderer.
LAV Audio Configuration > Mixing
Uncheck "Enable Mixing" checkbox.
Than you need to disable channel layout normalization, because it can screw up sometimes.
LAV Audio Configuration > Audio Settings
Uncheck "Convert Output to Standard Channel Layouts" checkbox.
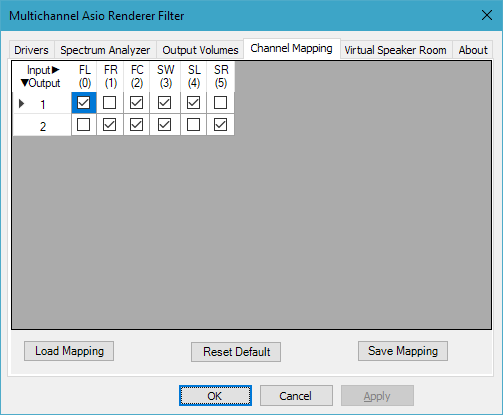
PotPlayer > [RMC] > Filters > Multichannel Asio Renderer Filter > Channel Mapping
During playback of video with multichannel audio you can check and uncheck checkboxes in this matrix to redirect sound streams to proper output channels.
Now you know this tricky way about how to use ASIO in Potplayer. But I remind you that this part of setup is very specific and for some of you may not work at all.
RESULT
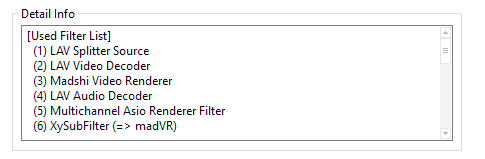
During video playback, you can perform detailed monitoring of almost all settings.
PotPlayer > *right mouse click* > Playback/System Info...
Here you can make sure that our stack works as expected and presented in the right order.
Also during playback you can press [Ctrl + J] combination and check MadVR rendering data.
EPILOGUE
That's it... Congratulation! We made it!
In the future this guide will be constantly updated with some new features or additional details and information. But at the moment I can't imagine what else can be added here, and so I will polish it and correct my bad English.
In update from 27.10.2018 I added XySubFilter in this stack.
In update from 28.10.2018 I added ASIO in this stack.
In update from 18.06.2020 I did some small remark about new version of Multichannel ASIO Renderer.
11.03.2024
People are asking to update this guide. But I am not sure what is outdated here. Some settings maybe changed their positions, some tools got extra, but overall it works good. So I updated some links and rising this article in feed. Once something will be changed dramatically this article will be updated but currently I have plenty of other staff I am working on.
15.04.2024
Check your "CPU queue size" and "CPU queue size". To hight value can cause player to hang. Corrected this part.
Thank you and stay tune!
Created by TennojiM
All rights reserved
© 2026
All rights reserved
© 2026